Wednesday, June 29, 2011

kathleen claiborne's hot cakes


Two thoughts:

1.     In 1980, the New York Times was worried about the popularity of pancakes.

2.     Is it possible for a pancake to be ephemeral?

I mean, this pancake has cornmeal in it, with crispy and buttery edges, but the inside – oh, the inside! – the inside is so light it’s almost ephemeral.


Seriously. This pancake – which is properly called a hot cake – almost lifts itself off my plate, it is so heavenly.

I thank Amanda Hesser of The Essential New York Times Cook Book: Classic Recipes for a New Century for bringing it to my attention. The recipe was first published in the New York Times in 1980, and it’s actually from food writer Craig Claiborne’s mother, Kathleen.

(I ask you: would you not be tickled to have your famous food-writing child publish your recipe in the New York Times? Perhaps you would not be tickled because you taught said food writer everything he knows. But perhaps you would. I would.)


Apparently, the recipe ran as part of a group of recipes cautiously heralding the return of the pancake. That was 31 years ago. Have we progressed since then?

I personally believe in pancakes. I grew up with both my dad and my granddad making hot cakes on the griddle on Saturday morning and Sunday lunch, so it is most likely in my genes. Scott and I now often eat pancakes for weekend breakfasts: banana-oatmeal pancakes, buttermilk-huckleberry pancakes, and now, these cornmeal hot cakes.


Oh, I see we’ve somehow gotten back to Kathleen Claiborne’s hot cakes. May I suggest again that you make them as soon as possible? That they are so delicate that they are almost ephemeral on the inside? That they taste buttery and faintly like corn, and that is a very good thing?

As Amanda Hesser points out in her book, this recipe does not get off to a promising start. First, you make a stiff little porridge of cornmeal and water. But you must not fear: when everything else is added, it does get smooth. Really, any recipe that calls for egg whites beat into stiff peaks must cook up light and airy in the end.


I have always been fond of fruit and yogurt on my pancakes, but Scott has been pulling me toward the simple life: butter and maple syrup. I find that works especially well here; the cornmeal makes the hot cakes almost savoury and that is a lovely match for the butter and syrup.

Now, what about you? Are pancakes dead or alive in your part of the world? What is your favourite?


kathleen claiborne’s hot cakes
adapted from The Essential New York Times Cook Book by Amanda Hesser

fries about 30 smallish hot cakes

1/2 c. cornmeal
1 tbsp. sugar
1/2 tsp. kosher salt or 1/4 tsp. regular salt
1 c. boiling water
2 eggs, separated
1 c. wheat flour
            Or gluten-free flours:
            40 g. (1/3 c.) brown rice flour
            47 g. (1/3 c. + 1 tbsp.) tapioca starch
            47 g. (1/3 c. + 1 tsp.) potato starch
2 tsp. baking powder
1/3 c. plain yogurt
2/3 c. milk
3 tbsp. + 1 tsp. canola, vegetable or corn oil
butter for frying

Stir cornmeal, sugar and salt together in a small, heavy-bottomed saucepan. Pour the boiling water, whisking to get all the lumps out. Bring to a simmer over medium-low heat. Stir for 1 – 2 minutes. The cornmeal will suddenly stiffen – fear not. Transfer it to a serving bowl to cool a bit. Whisk every so often to help it cool. (If you’re really impatient and worried about egg yolks cooking later, put it in the fridge.)

Beat the egg whites until they form stiff peaks. Set aside.

In a small bowl, beat the egg yolks quickly with a fork to loosen them up. Set aside.

Measure the flour(s) and baking powder and mix well. Set aside.

Measure the yogurt and stir into the milk. (Use a whisk if they’re being stubborn.)

If the corn mush has cooled somewhat, whisk the yolks into it. Whisk in the flour-baking powder mixture and don’t worry about how thick it gets. Whisk in the yogurt-milk mixture and oil – see, all smooth now. Carefully, fold the egg whites in.

Heat your griddle to medium-high. Butter the griddle well, and repeat for each set of hot cakes so they all taste equally buttery. Scoop about 3 tbsp. of batter for each pancake. (They won’t spread much, so you can set them fairly close together.)
Fry until you see bubbles popping and the edges setting slightly. Flip and fry until golden brown on the other side. Serve immediately or keep warm in the oven set to 175 degrees Fahrenheit.

Serve with butter and maple syrup.

Friday, June 17, 2011

tomato cheddar souffle with asparagus


Back when I was in second-year university and suffering from an acute case of young heartbreak, my mother flew all the way out to Halifax for a week to cheer me up.

It was great, actually. I went to class and she made dinner. And in our spare time, I showed her all around the city.

One late afternoon while I was studying, she said she wanted to make a soufflé for dinner and asked if I had any recipes. We checked my cookbooks, but couldn’t find any. We were stumped. (Of course, by that point, I was craving soufflé.)

Then – I had a brainwave.

It was 1998, after all – I could check the Internet!

It seems so hard to believe now, but I could only find one source for recipes on line, out of Berkeley. It was called RecipeSource.

Sure enough, we found a recipe for tomato cheddar soufflé. 


Mom baked it up for dinner and it has been our family tomato cheddar soufflé recipe ever since.

However, my mother is one of those cooks who never lets a (very) good recipe go untinkered. If she can add more vegetables, less sugar, or more dried fruit to a recipe, she most certainly will.


In this case, she tried adding asparagus. And she was right: the crunchy bits of asparagus provide a good foil for the airy soufflé. Now, I always add asparagus in the late spring.

This soufflé does not rely on its pretty, puffy exterior to make up for taste. (Which is a good thing, considering how quickly soufflés fall.) Both the cheddar and the tomato juice kick the flavour quotient way up.

You can make the soufflé in both a large casserole dish or in individual ramekins.


I’ve been leaning towards ramekins lately because:

(a) They help justify my ramekin collection; and
(b) They cook the soufflés more quickly
 
Now, I know you might be thinking that this is all well and good, but soufflés are too intimidating. Not so, I say!

I whipped up these little soufflés – and stopped to take pictures along the way – and made rice and sliced up cucumber and started washing the dishes . . . all in under an hour.

What kind of a gourmet dinner is ready in less than an hour? This one.

The only fancy tool you need is a double boiler. But if you don’t have one, you could always suspend a metal bowl over boiling water. (Be sure to use oven mitts as you hold on to it.)

By the way, I looked up that Berkeley site again just for fun. I found the exact recipe – it even has the same font as I remember. If you’d like to see it, it’s here.


last june: chilli pasta

tomato cheddar soufflé with asparagus
slightly adapted from RecipeSource

serves 4

3/4 c. asparagus, chopped to 1/3 inch (1 cm) pieces
3 tbsp. butter
3 tbsp. wheat flour
            or, gluten-free flours:
            1 tbsp. potato starch
            1 tbsp. tapioca starch
            1 tbsp. brown rice flour
1/2 tsp. salt
sprinkle of cayenne
1 c. tomato juice
1 c. cheddar cheese, grated*
3 egg yolks, beaten
3 egg whites

Butter your casserole dish or ramekins. Preheat the oven to 325 degrees Fahrenheit.

Steam or boil the asparagus for 4 minutes or until just tender. Drain and set aside.

Get the water boiling on the bottom of your double boiler. In the meantime, do everything you can to prepare. Measure your flours and salt. Get the cayenne ready to sprinkle. Measure the tomato juice. Grate the cheese. Beat the egg yolks.

Melt the butter in the top of the double boiler. Whisk in the flour(s). Whisk in the salt and cayenne. Let it simmer slightly for a few minutes to bind together.

Slowly add the tomato juice, whisking as you go. Cook and stir until it gets thick. Slowly add the cheese – keep whisking! Slowly add the yolk, whisking as you go. Stir in the asparagus. Cool to room temperature.

Beat the egg whites in a separate bowl until stiff peaks form. Fold them into the cooled tomato juice-cheese mixture. (You may have to very politely show the egg whites who’s boss here, as they have a tendency to be reluctant.)

Slide into the oven. Bake for about 50 minutes in one casserole dish, or 20 – 25 minutes in ramekins.

*Normally, I am a white cheddar girl. But I like orange cheddar for this recipe, because it produces the desired orange soufflé colour, thus indicating it is, in fact, a cheese soufflé.

Tuesday, June 7, 2011

blueberry rhubarb rum jam


When we went to the farm the weekend before last, we found a vast selection of rhubarb and greens. Everything else is behind, due to our incredibly rainy spring.

But we also found last summer’s blueberries in the freezer. I couldn’t resist buying them, if only because I have eaten enough grapefruit for breakfast and oranges for snack time to last me well until next winter.

And then, as we drove home along the water, inspiration struck: blueberry rhubarb jam! Yes, I thought, I’ll do one part rhubarb to two parts blueberry – basically, enough rhubarb to perk up the blueberries but not so much that it’s chalky.

For a little while, I was very proud of myself. Imagine inventing such an unusual combination!


Turns out – according to the Internet – lots of people beat me to it. There’s even a name for it: blubarb jam. It seems possible I am not so creative after all. (I am also quite certain I would never have thought of the word blubarb.)

However, I did not let that dissuade me and I plowed ahead, washing canning jars and chopping rhubarb.  I found a recipe attributed to Canadian Living Magazine on lots of sites, but it wasn’t actually on Canadian Living’s site. It didn’t call for pectin – which always makes me nervous – but Canadian Living has proven itself so trustworthy and reliable (like a good Canadian) that I gave it a go.

Because I relish alcoholic jam on toast in the morning, I also stirred in a bit of rum at the end. The jam came out like an intense blueberry on a late summer’s day, with just a hint of rhubarb and rum rounding it off. Even without pectin, it set perfectly.

I hadn’t actually planned to share this jam with you, because it is so close to the original. But as I slather it on my toast every morning, I feel guilty that you might not know about it yet.

That’s why you don’t see any pictures of the whole jam-making process. Those little chopped rhubarb up above are actually body doubles. They’re just hanging out until I stew them this evening. And there are no pictures of frozen blueberries, because I put them all in the jam. Who wants to see a picture of a frozen blueberry, anyway?

Just make some jam and spread it on your toast in the morning and be happy.


blueberry rhubarb rum jam
slightly adapted from a recipe attributed to Canadian Living Magazine

Makes about 8 cups of jam

8 c. blueberries
4 c. rhubarb, chopped into 1/4-inch pieces
1 tsp. lemon rind
2 tbsp. lemon juice
1 c. water
4 c. sugar
1/4 c. rum

Bring the blueberries, rhubarb, lemon rind and juice, and sugar to a boil in a heavy pot. Stir often while you’re bringing the heat up.

Turn the heat down and simmer, stirring often for about 25 minutes – until the rhubarb is very tender and your spoon can easily break through it against the side of the pot.

Turn the heat up to medium and add the sugar. Bring to a boil, stirring often. Once it has reached the setting point,* remove from the heat. Stir in the rum. Stir for a couple minutes to move the fruit pieces. Use a spoon to remove any skim.

Fill sterilized jars. Process in a hot water canner for 10 minutes.

*For me, the setting point was about 210 degrees Farhenheit, although the original recipe called for 218 – 220 degrees Fahrenheit. Another way to test the jam is to dollop some on a small plate that has been in the freezer. Use the back of a spoon to push against the jam. If it wrinkles, it’s ready.

Wednesday, June 1, 2011

oregon hazelnut salad


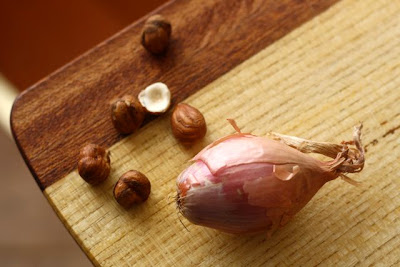
I name this salad in honour of the Oregon hazelnut.

I had been to Portland before, but our trip last week opened my eyes to the abundance of hazelnuts growing around the city. On our first day exploring the vineyards in the nearby Willamette Valley, we spotted stands of hazelnut trees nudged up to the grape vines.

I have a long history with hazelnut trees, because it was my job as a child to gather all the hazelnuts under both our trees. (Not to mention walnuts, cherries, plums, peaches, apples, raspberries and currants. I was a hardworking child.)


So, once I reacquainted myself with the hazelnut tree in the Willamette Valley, I suddenly started seeing them everywhere around Portland.

I was going to ask the rhetorical question: does Oregon have a state nut and is it the hazelnut?

But it is not a rhetorical question! I looked it up, and yes, Oregon declared the hazelnut to be its state nut in 1989. So there you go.

This means, of course, that Oregonians like to eat hazelnuts. I think we had them with almost every meal. I wasn’t complaining.

One lovely way I encountered them was in a lightly dressed salad at Tina’s in Dundee, about an hour outside of Portland. 


It was the heart of simplicity: just a few very good ingredients. In this case, roasted hazelnuts with delicate spring lettuce and a light vinaigratte. The hazelnuts gave a light crunch beside the soft new lettuce. The vinaigrette was flavourful but unassuming, with tiny bits of shallot and parmesan almost melting into the lettuce leaf.

I am starting to believe that the better the salad the smaller the ingredient list. Because, if the lettuce and one other ingredient (say, hazelnuts) are perfect, then you won’t want anything else.


This weekend, I set about recreating that salad with Island lettuce, hazelnuts, parmesan and shallots. It seems I am incapable of creating a mild vinaigrette – probably due to my deep love of vinegar – but this dressing comes close to the Tina’s version. I used an immersion blender to whir in the parmesan, but you could just grate it finely.

After eating this salad for two evenings, we ran out of spring lettuce. I am now happy to report the vinaigrette works very well dribbled over poached salmon and steamed asparagus. But I did miss the hazelnuts.


oregon hazelnut salad

hazelnuts
2 tbsp. white wine vinegar (red would probably also work)
1 tbsp. olive oil
2 tbsp. neutral oil, such as canola or grapeseed
2 tbsp. parmesan, grated finely
2 tbsp. shallot, minced
salt and pepper
new lettuce

Preheat the oven to 350 degrees Fahrenheit.

Roast the hazelnuts in a small pan until they are slightly golden, about 7 minutes. Watch them carefully, as they move over to burning quickly.  Remove them from the oven. If you like, take a clean tea towel and rub them gently to take off some of their brown skin. Set aside.

Macerate the shallots in the vinegar for 15 minutes. (This will help them soften and share flavours with the vinegar.) Strain the shallots out, keeping both the vinegar and the shallots.

Mix the vinegar, oils and parmesan together. Use an immersion blender if you really want the parmesan to break down. Stir in the shallots. Taste and add salt and pepper.

When you’re ready to eat, toss the lettuce with the vinaigrette. Drop in the hazelnuts. Serve immediately.